
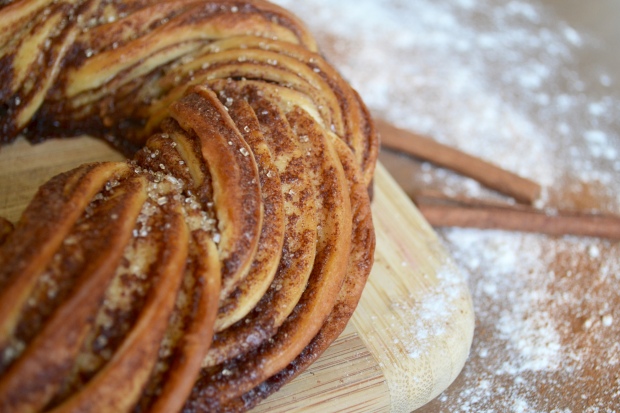
Ok…so I’m a little delayed in getting this recipe to you guys and I get there’s no way you’re going to fit this into your already packed and hectic Easter weekend but here’s the truth – I totally had a FAIL on the first one! It happens y’all. This is my first time working with yeast and rising dough and sometimes it just takes practice. Good news is that while the first one didn’t turn out as pretty as I was hoping, it still tasted AMAZING and there was no complaining in this household when I said, “Well…we’re just going to try that one again!” And BAM. Not only did it turn out beautiful but I also was able to test some theories I had from my flaws on the first one that I can now share with you. So here we go, this yummy and beautiful Cinnamon Twist Wreath by Chatelaine.

Before we get into the tips and tricks, let’s just take a moment to appreciate the greatness of cinnamon rolls. Seriously…a warm, gooey dough topped with butter, brown sugar and cinnamon that can then be doused in things like powdered sugar and melted icing? And then eating it? It’s like a Twizzler! You can bite right into it or do the fun unravel thing to savor every bite.
And the best thing, there is NO WRONG TIME for cinnamon rolls. No limit on seasons like my beloved pumpkin and key lime (although I arguably will use those ingredients any time of year as well). Dessert or breakfast? Doesn’t matter. All hail the cinnamon roll!!

Ok, I’ve said my piece…now we can get back to this delight. So, as I’d mentioned, this was my very first time working with yeast. Kind of intimidating but really easy to work with so long as you GIVE YOURSELF TIME. I am victim of not being patient while baking. How can you not open the oven just a little bit to see how things are going in there? But when it comes to yeast and dough rising, you really have to give yourself time so pay attention to the directions (on the package and in the recipe below) when it comes to these things.

Next tip, once you start rolling out the dough and spreading on the buttery goodness, it’ll start to get a bit warm (therefore sticky and a little hard to work with). In my experience working with cookie dough (see my favorite cookie dough recipes here!), molding and cutting is always best with cold dough. So, I’ve added a step into this recipe to help cool the dough down. Once the cinnamon brown sugar butter mix is on your dough, put it on a parchment lined baking sheet FLAT and stick it in the fridge. I promise this will make it MUCH easier to roll and cut. You’ll thank me.

-Image by Chatelaine-
After you’ve brought the dough back down to a cooler temperature it’s time to roll! This is another part I messed up on on my first try. I just let the dough kind of roll itself versus controlling the initial roll a little. So, second time around I rolled just the teeniest, tiniest bit up and almost pinched it down on itself. By doing this, I was able to have way more rolls, creating more pretty folds and layers in the final product.
With the dough being a bit cooler, the cutting and twisting process also becomes much easier. Again, manhandle the dough a little bit – don’t be afraid of making it twist and stay as tight as you want. Final tip here: in addition to the egg wash, you may find it helpful to use a toothpick or two to hold some pieces together. I didn’t need any initially but in keeping an eye on it in the oven as it rose, I saw a piece here or there coming apart. By gently sliding in a toothpick (twist, don’t poke!) I was able to secure all the folds until they molded together on their own.

-Image by Chatelaine-
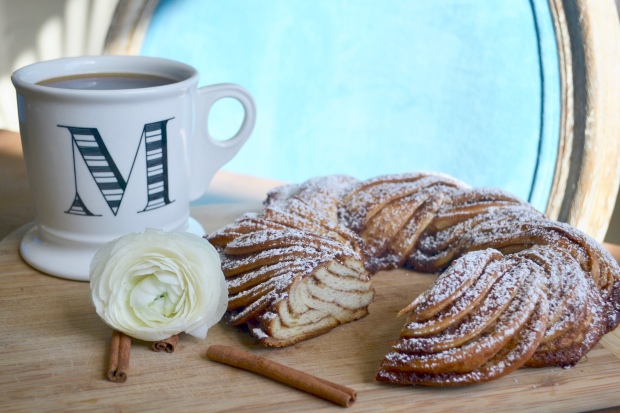
What else? Ah yes – as with most pastries, if you’re insecure about some of those little imperfections – just douse it in powdered sugar 🙂

INGREDIENTS
- 2 1/4 (8g) active dry yeast
- 1/3 cup warm water (120-130F)
- 1/2 cup warm milk (120-130F)
- 1/4 cup unsalted butter, melted
- 2 egg yolks
- 2 3/4 cup all-purpose flour
- 1/4 cup granulated sugar
- 1 tsp salt
- 2 tbsp icing sugar (I used vanilla turbinado sugar and powdered sugar)
THE FILLING:
- 1/2 cup unsalted butter, room temp
- 1/2 cup brown sugar
- 1 tbsp cinnamon
THE EGG WASH:
- 1 egg beaten
- 1 tbsp water
DIRECTIONS
- Combine yeast with warm water (I just used a fork) in the bowl of your stand up mixer. Let stand until frothy (about 10 min).
- Fit mixer with dough hook and add warm milk, melted butter and yolks until combined.
- Add flour, granulated sugar and salt. Beat on medium until dough is smooth and pulls cleanly away from the bottom of bowl (about 4-6 mins).
- Transfer to a lightly oiled bowl and cover loosely with a damp kitchen towel. LET REST until dough is doubled in size (about 1 hour).
- While dough is resting, mix brown sugar with room temp butter and cinnamon. And prepare egg wash by combining ingredients.
- Once dough has doubled, turn out on a lightly floured surface and roll out (helps to have a floured rolling pin and sprinkle flour on dough as needed to avoid sticking) to a 22×12″ rectangle. Trim as needed.
- Spread butter mixture evenly over dough all the way to edges.
- Transfer rectangle to a parchment lined cookie sheet and refrigerate for about 15-20 mins.
- Remove dough from fridge and transfer parchment paper and dough to table top to begin rolling. Working with the longest side at your belly, gently roll up a tiny bit of the edge and almost pinch into itself. Once this roll has begun, guide the dough into a tight roll until you end with seam-side up.
- Use a sharp knife to cut the log lengthwise in half along the seam.
- Tightly weave two pieces together, leaving the cut sides exposed (see image above).
- Gently transfer to prepared sheet and brush a 2″ portion of one woven end with egg wash. Form into a wreath and pinch egg-washed end underneath other to seal.
- Cover with same damp kitchen towel and let rise until doubled for 1 more hour.
- Preheat oven to 325.
- Bake in center of oven until bread is deep golden, 35-40 mins. Cool slightly. Dust with icing sugars before serving.
*For additional tips read blog post above! For picture instructions see recipe on Chatelaine!*

– Recipe: Chatelaine l Mug: Anthropologie l Pink Plate: Vintage –

How lovely! I’m sure it was delicious 🙂 🙂
LikeLike
Thank you Linda – it’s incredibly yummy!
LikeLiked by 1 person
That looks wonderful. Thanks for sharing.
LikeLiked by 1 person
Beautiful in all ways and one to try out!
LikeLiked by 1 person
I made it and it turned out awesome. It was so delicious. I couldn’t have done it without your detailed instruction and all your helpful tips. Thank you so much for sharing this. I’ll be making it often. My whole family loves it and what a nice gift it could be as well!
LikeLike
Oh Karen it looked beautiful and delicious on your Instagram. So happy to hear this was so helpful to you and has become a family favorite. I just love how it fills the house with the smell of a toasty weekend morning.
LikeLike